Blocks: How to Add Style Variations to Existing Blocks using register_block_style()
Welcome to another WordPress development tutorial! In this guide, we’ll dive into adding custom block style variations using the register_block_style() function. You’ll learn how to easily add your own unique styles to existing blocks, giving your WordPress website a personalized touch.
Understanding the function

Before we get started, I’ll explain what this function does. The register_block_style() function allows you to define new styles that can be used by blocks in the Block Editor.
Once the new block styles are defined and added, users in the Block Editor can simply click a button in the Inspector panel to apply that style directly to the selected block, without needing to manually add a CSS class or write any code. This can save you a lot of time and add a positive impact to your workflow, while keeping the look and feel of your site consistent.
Preparing Your Development Environment
To follow along with this tutorial, you’ll need a few tools:
- A code editor (e.g., Visual Studio Code, Sublime Text)
- A local WordPress installation for testing your changes – I recommend using Local by Flywheel
If you’re new to setting up a WordPress development environment, don’t worry! There are plenty of resources online to help you get started. I won’t go into those instructions here, but if you do a Web Search you’ll find what you need.
Exploring Block Style Variations

Let’s dive into the function. We will use the function to define a custom block style variation for the Paragraph block. These definitions dictate how different blocks look and behave on your website. It’s essential to understand the structure and syntax of these definitions to customize them effectively.
Luckily for us, this simple function is little more than an array with a list of key-value pairs. If you’re not familiar with a key-value pair, this is basically when you define a variable and what its value should be… Example: “color: blue” would be represented as 'color' => 'blue'.
As a practical example, let’s say we wanted to create a custom class for the Paragraph block that will automatically give it a red border with some padding inside it. We can use register_block_style() to do so. Let’s explore this next.
Adding a Custom Style Variation to an Existing Block
Now, the fun part! We’ll go through the process of adding custom style variations to an existing block — specifically, the Paragraph block.
When creating block style variations, you’ll need to:
- Identify the block you want to customize.
- If you do not already have a file for this purpose, create a new empty file in your theme folder and name it
custom-block-styles.php. Open the file in your code editor. - Add the style variation definitions to suit your needs.

First, let’s identify the block we want to customize. In the Block Editor, add a Paragraph block. Once you see the block is on the page, right-click on it to inspect the block. We are looking for the data-type attribute. For the Paragraph block, this is data-type="core/paragraph". Keep this in mind for the next step.
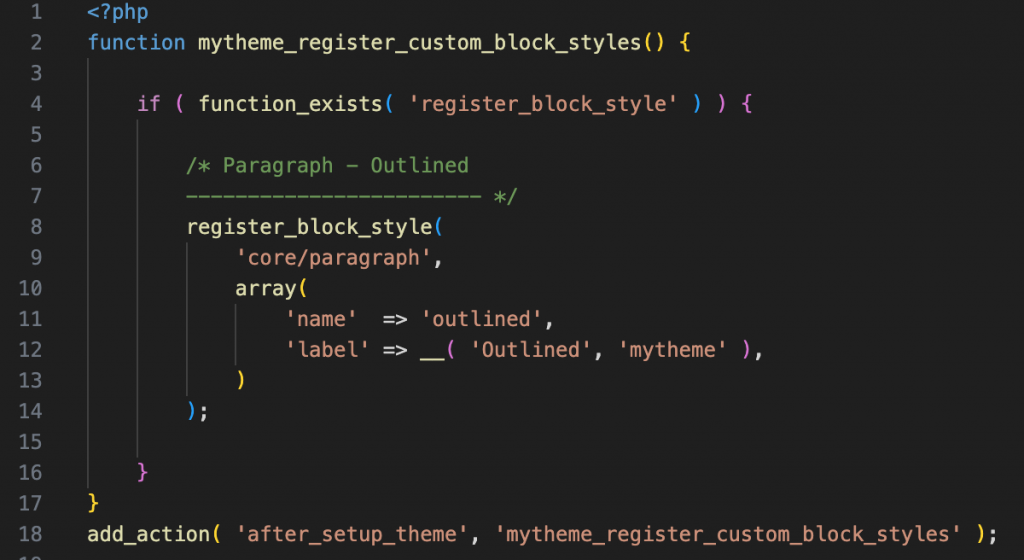
Inside the custom-block-styles.php file, add the following code:
function mytheme_register_block_styles() {

    if ( function_exists( 'register_block_style' ) ) {

        /* Paragraph - Outlined
        ------------------------ */
        register_block_style(
            'core/paragraph',
            array(
                'name'  => 'outlined',
                'label' => __( 'Outlined', 'mytheme' ),
            )
        );

    }
}
add_action( 'after_setup_theme', 'mytheme_register_block_styles' );
Now, I’ll go over what this code does.
First, we define the main function that will be called. We named it mytheme_register_block_styles()
Next, inside the main function, we check to see if we can run register_block_style(). We need to do this check first because if we are on a system that is not running the latest version of WordPress, the function might not exist and the server will throw an error.
Next, we know we can run the register_block_style() function, so we use it.
The first line here is the block we want to customize. We got this from the data-type attribute value in the Paragraph block in the previous step.
Then, we define an array with some required info. When defining a block style variation, it is required to assign a Name for this style (a slug). Make sure the name is unique to avoid confusion. The other required value we need to set is the Label (the name that will display in the Block Editor). I have used a local translation function here, but it is not necessary.
There are other optional settings that can be configured, you can find those in the official documentation.
Save the file in your theme folder.
Enqueueing the Style Variations File
Next, we want to make sure our custom style variations code file is loaded into the site.
In your theme’s functions.php file, add the following code:
// Add custom block styles.
require_once get_stylesheet_directory() . '/custom-block-styles.php';
Make sure the path to your custom-block-styles.php file is correct.
Save the functions.php file in your theme.
Adding CSS Styles for the Variation
Next, we want to add some CSS code to change the appearance of the block.
In your theme folder, create a new file called custom-block-styles.css, and add the following:
.is-style-outlined {
    padding: 10px 16px;
    border-radius: 4px;
    border: 1px solid #ff0000;
}
Notice the structure here. All block style variations will have a class name automatically applied to the blocks, and the class name will always start with is-style- , followed by the Name slug we defined.
Now we need to enqueue the new CSS file.
In your theme’s functions.php file, add the following code:
add_action( 'enqueue_block_assets', 'mytheme_enqueue_custom_block_styles' );
function mytheme_enqueue_custom_block_styles() {
    wp_enqueue_style( 'custom-block-styles', get_stylesheet_directory_uri() . '/custom-block-styles.css' );
}
Make sure the path to your custom-block-styles.css file is correct.
You’ll notice this time we use an action called enqueue_block_assets. This will ensure our custom block styles are enqueued only for the blocks that are using it.
Save the functions.php file in your theme.
Testing the Custom Style Variation

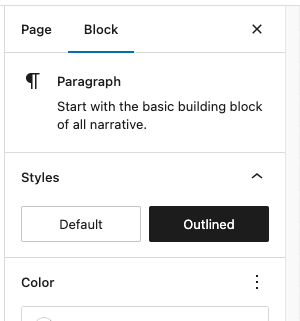
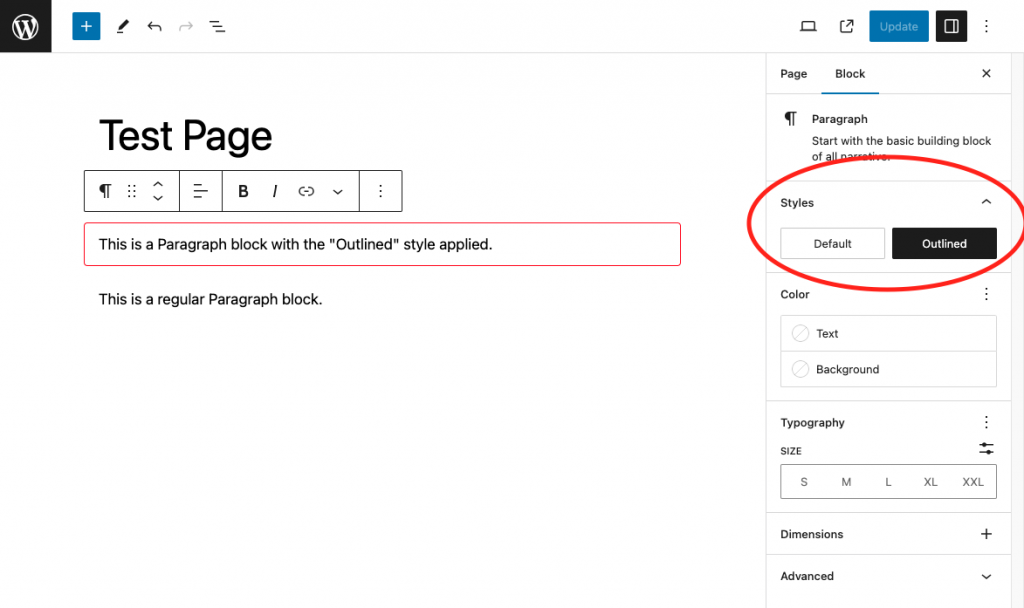
Now that we’ve added a custom style variation and its associated CSS styles, we can start testing it out. Refresh the Block Editor, and select a Paragraph block, then navigate to the Styles tab. In the Inspector panel, you should now see a Styles section at the top with your custom “Outlined” style as an option.
Click the “Outlined” button to apply the style.
Congratulations! 👏 You’ve successfully added your own style variations to existing blocks. I encourage you to experiment and create custom versions of the blocks you are already using.
Thank you for joining me in this WordPress development tutorial! I hope you’ve gained valuable insights into customizing block styles using register_block_style()
Feedback and Questions
I value your feedback and questions! Please feel free to leave comments below or contact me with any inquiries or suggestions.
Leave a Reply